Friday, December 10, 2010

How to build a wood fired bread oven... the bread begins!


The Natives are restless. As I go through my daily business in our little town of Cave Creek Arizona, my friends and neighbors keep asking when the bread will be for sale. I tell them I’m working on it and give the latest update as far as baking progress.

My bread recipes are coming along and with each firing of the oven I learn more about the nature of this amazing piece of cooking equipment. As I run into difficult patches I find myself going back to advice that I have been giving aspiring cooks for the past few decades. I have offered the rule of three many times over the years. It goes something like this; take any dish that you would like to make and find a good recipe. Make it exactly as written three times stopping to think about what worked and what needed improvement by the third time you will be making a good solid example of what ever you are shooting for. The first time I tried baking in the big oven it came out heavy and dull. I was distraught… after all I’m supposed to be a cooking instructor. My wife Chef Kathy reminded me of the rule of three and the fact that it’s a learning experience.


I went back at it and on the third try I made real bread with a thick chewy crust that made a crunching sound as I bit into it. The flavor was deep rich and complex. My ingredients; flour, water and salt. I hope that you will use this blog as a resource to answer all your questions on baking and the construction and use of the wood fired “Black” oven.


Monday, December 6, 2010

From Bricks to Bread the Wood-Fired Oven

So the oven is completed except the stucco and paint, which we will finish after the pavilion that houses the oven is built. We are now working on our bread recipe and the layout of our lot for the future cooking school. Our concept is garden to plate cooking and the education of everything in between. I’m keeping a journal of this process and planning to write a companion book called “From Bricks to Bread, a journey into the wood-fired bread oven”. After a lifetime of cooking with wood I am now going in this natural direction. Bread and the wood-fired oven are both a real challenge. They require a dedication and the learning of the natural cycles of both the oven and the life cycle of natural leavens. I’m enjoying this process much more than I can express. Once again I’m excited about cooking. Kathy and I talk about these processes and possibilities for hours on end. We are planning our next stage of life. It will be based around the wood-fired oven and a cooking school. If this works out Kathy can work from home and we can cater, teach, entertain and offer a location for others to give classes and workshops. We are also going to offering a location for meetings and even weddings.

Below are the pictures of the last stages of the oven build for those that are interested.

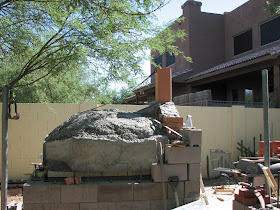
I used foam to make the form for the cladding, his holds in the heat and functions as mass for extended bakings.

This shot shows all of the cladding before we close it in the walls and add final insulation.


The front arch form and keyway.

Chimney facia with cut to follow roofline.
Rafters and block wall that will hold final insulation.

Top view of oven cladding before zonalite insulation.
Once again "mock up" of tile layout.
Dry stacked block and anchor bolt for rafter tie.

Zonalite insulation.
Our new puppy Max.
Finishing a large leaf into the counter top.
Pour of tables for bread baking classes.

Mesh and bar allow a long table with a clear span. Make sure and let this cure, keep a brace for a few weeks to fully allow the mud to harden.
End view of north table.
Pour in front of oven.
Shot of tile roof. I bought the tile on Craigslist for $35.
Nice view of front of oven. I have hundreds of shots if you need to see anything just shoot me a note and I'll post it.