Saturday, January 22, 2011
Mad coyote Joe's Blah Blah Blog: Cooking School update
Mad coyote Joe's Blah Blah Blog: Cooking School update: "In building the cooking school there are several issues that I need to deal with. I’m building a venue that will serve as a school, an e..."
Friday, January 21, 2011
Cooking School update

In building the cooking school there are several issues that I need to deal with. I’m building a venue that will serve as a school, an event location, as in weddings, meetings, perhaps a gallery, also we are looking at television and photo shoots maybe even exercise, tai chi, or even lectures and workshops. I’m, by nature, a packrat I love to collect things that others have discarded and then reuse them in construction or sculpture. This is a challenge as, I’m having to toss out things that may have a future use, but the business comes first.
I have divided our property into three outdoor and four indoor areas. Our home and the packaging room for our spice company, the connex box which will be used as an art studio, a garage and a storage area and the classroom and kitchen are all indoor venues and out door we have the cooking set and bakery, the main yard and a 16 car parking lot. My plan is to finish the bakery and cooking set first so that we can start outdoor cooking classes this spring. We will use the money from these classes to finish the other venues.

I’m working on the connex box, which I want to make look more like a little adobe building and less like a shipping container.

I'm using a CIP or cast in place adobe system of my own design.

I was given the dirt for my adobes and after inspecting it I became worried about the ratio of sand to soil.
Most of the information floating around the web and in the various books on adobe construction in our library agrees that adobe needs to be a minimum mix of 30 % clay and 70% sand and no more than 50/50. After doing a standard water / soil test my dirt looks like it’s about 80% sand 20% clay.

So I made two test blocks as I have two different piles of dirt. You can see the rings from the cardboard drink case I used as a form,

My system has additional reinforcement in several different areas that standard adobe is missing.

First it’s attached to the connex box, second it has a chain link fence diaphragm, third it has a two-inch hi density foam exterior that is tied to both the box and the fence. After making my test blocks I believe that it will be more than strong enough.

However as an added binder I’m going to add a shovel of gypsum to each wheelbarrow, which will be about 5%. I’ll let you know how it works out.
Saturday, January 15, 2011
Yes I'm now doing wedding ceremonies!

So you’re getting married and looking for someone to lead the ceremony. If you’re looking for something other than the standard, justice of the peace or church based wedding, why not have me come officiate the happy event.
I’ll come to your house, your favorite Coffee shop, the park or even the back seat of the first car, you made out in… what ever you have in mind. I'm the official that will do what ever it is that you and your spouse to be, can think of to commemorate your marriage. If you’re 19 and marrying your childhood sweetheart you want someone else. Second, third, fourth, late in life or festive weddings are what I do well.
A few years ago a good friend was getting married and asked me to get ordained so I could perform weddings in Arizona. By the authority granted me by the State of Arizona and The Universal Life Church of Modesto California I can now pronounce you man and wife. Next it was a western themed wedding. So I’m becoming the guy that people call for a different ceremony. Let’s see what you have in mind and make it happen.
Warmly,
The Right Reverend Mad Coyote Joe
Friday, January 14, 2011
Shipping Container Houses

Shipping Container houses

One of the areas of study that I have concerned my self with over the years is low cost housing. I’ve built with adobe and straw bale, and my friend Ed has used giant foam blocks and recycled lumber; always looking for a method that provides structure, insulation and an esthetic that one can enjoy.

Along the way I became aware of shipping containers also known as Connex boxes. They are strong, structural and best of all cheap.

Architects are using them in different arrangements to build houses and offices.
My interest was in building a second home for Kathy and myself or a home for one or both of our children. Drywall can be screwed to the interior walls and foam glued to the exterior providing a strong, well insulated structure. I wanted to add mass so I decided on using a system that I have been working on in my landscape for the past few years. I have been building walls out of cast in place adobe.

I use just plain old dirt out of my yard. I mix water into the dirt, in a wheelbarrow and pour it into a form. This is placed on a concrete foundation that comes above the ground by about five inches to create a break between the earth for reasons of termites and water. Once the mud sets up I remove the forms and move them up, for the next pour. The earth, dried in this Arizona sun, is rock hard. After the walls are finished I drive ring-shank nails into the adobe to hold stucco netting and then cover it with a coat of fiber-strengthened stucco. The end result is massive, bullet proof (literally) and very inexpensive.

In applying this to shipping container construction I am adding a two-inch layer of foam used both as a form and as future insulation.

As with my walls I’m placing a vertical layer of recycled chain link fencing to add both reinforcement and a structural diaphragm.

I’m tying this to the box along with running a nylon twine to the exterior of the foam for stucco wire connection. I chose the twine over tie wire as wire can both stretch and rust, twine will do neither. The end product will be a layer of insulation, which I run down below grade about eight inches to create a thermal break from the brutal Arizona sun.

Then I have one foot of adobe for mass and then the box it’s self. I plan on doing a living roof. Please ask any questions or leave any comments that you might have.

Monday, January 10, 2011
Mad Coyote Web Site

Okay
I'm putting my website back up. It will be a place that you can order our spices, have me come cook for your next event, sign up for a cooking class, even have me be the Official Reverend at your wedding. It's just coming together, so stop by and take a look I'd love any thoughts or ideas that you might have. The web site is http://madcoyote.weebly.com/index.html
Let me know what you think.
Thursday, December 30, 2010
A Mad Coyote Christmas
A Mad Coyote Christmas

Christmas this year was a hoot. My butchers John and Dean at Bashas’ in Carefree cut me out a nice 6 bone Standing Rib Roast. We try to avoid turkey on both Thanksgiving and Christmas because Kathy has usually been cooking up to 8o turkey dinners… some years more and so we go a different direction.
 I rubbed the roast with olive oil, black pepper, Kosher salt and fresh thyme.

I stuff a few cloves of garlic into the cut between the roast and the bones and a tuck a few sprigs of rosemary under the strings the butcher tied the roast with.
I used my new iron roasting pan that I got at a garage sale for $10. I pre heated the oven to 410°f. I popped the roast into the hot oven for about 45 minutes, it was nice and brown, so I reduced the temperature to 375°f for another hour and a half once the roast reached 118°f at the thickest part of the roast I took it out and let it rest for 20 minutes.

It was perfect.

I roasted a few chiles and peeled them and made a quick calabacitas along with some oven roasted tri-color potatoes and baby carrots

We also hadAspargus and creamed Horseradish, a cheese plate and Pecan Pie.
Our kids came by along with my mom. We feasted and drank some good zinfindel and all in all had a great night. If you have any questions on these or any other recipes just ask. Have a great New Year.

Warmly,
Mad Coyote Joe
Sunday, December 19, 2010
Baguettes and Country white bread just out of the wood fired oven!
Sucess at Last!
This is our first batch of any size, sixteen loaves, eight Baguettes and eight Country white. The Country white is coming out the same every time; light, mild sour dough, with a crunch that can be heard across the room… delicious!

The Baguettes are getting better with each bake, this time we have the flavor and crunch we are looking for, but the surface is a little irregular and the final loaf is not deep in color.

We are thinking maybe an egg-wash will produce the color we are looking for. For the next bake we are thinking maybe 16-32 loafs of each. After the oven gets hot enough, each bake takes about 30% more time, so we need to use hearth space as economically as possible.

I believe we can do about 30 Country loaves per bake and about 16-18 loaves of Baguette, per bake. Add that to about 10 – 12 bakes per fire and we’ve got a nice little bread business on our hands. The best part of this process is I feel alive about food again, like when I was 28 and had little kids and a young wife that I was grilling for. My mind is busy with the process of baking and it feels good.

Kathy is still by my side, tasting and helping and suggesting, only now she is an Executive chef with 35 years of cooking under her belt. Money is tight, business is slow, and my health is still in question, but life here is good!
While we were getting our oven heated and our bread dough ready, I put a pork shoulder with baby red potatoes and about 20 garlic cloves in an old iron Dutch oven in about two inches of chicken broth. As the fire was quite hot, I placed it just in the doorway. Right before our first bake, I took it inside and let it rest. When the baking was done we had supper, the pork was juicy and almost sweet, combined with the Country white just out of the oven with a schmear of organic sweet cream butter, a few cloves of the roasted garlic and a glass of Cabernet. It wasn’t fancy but WOW! Did it taste great!
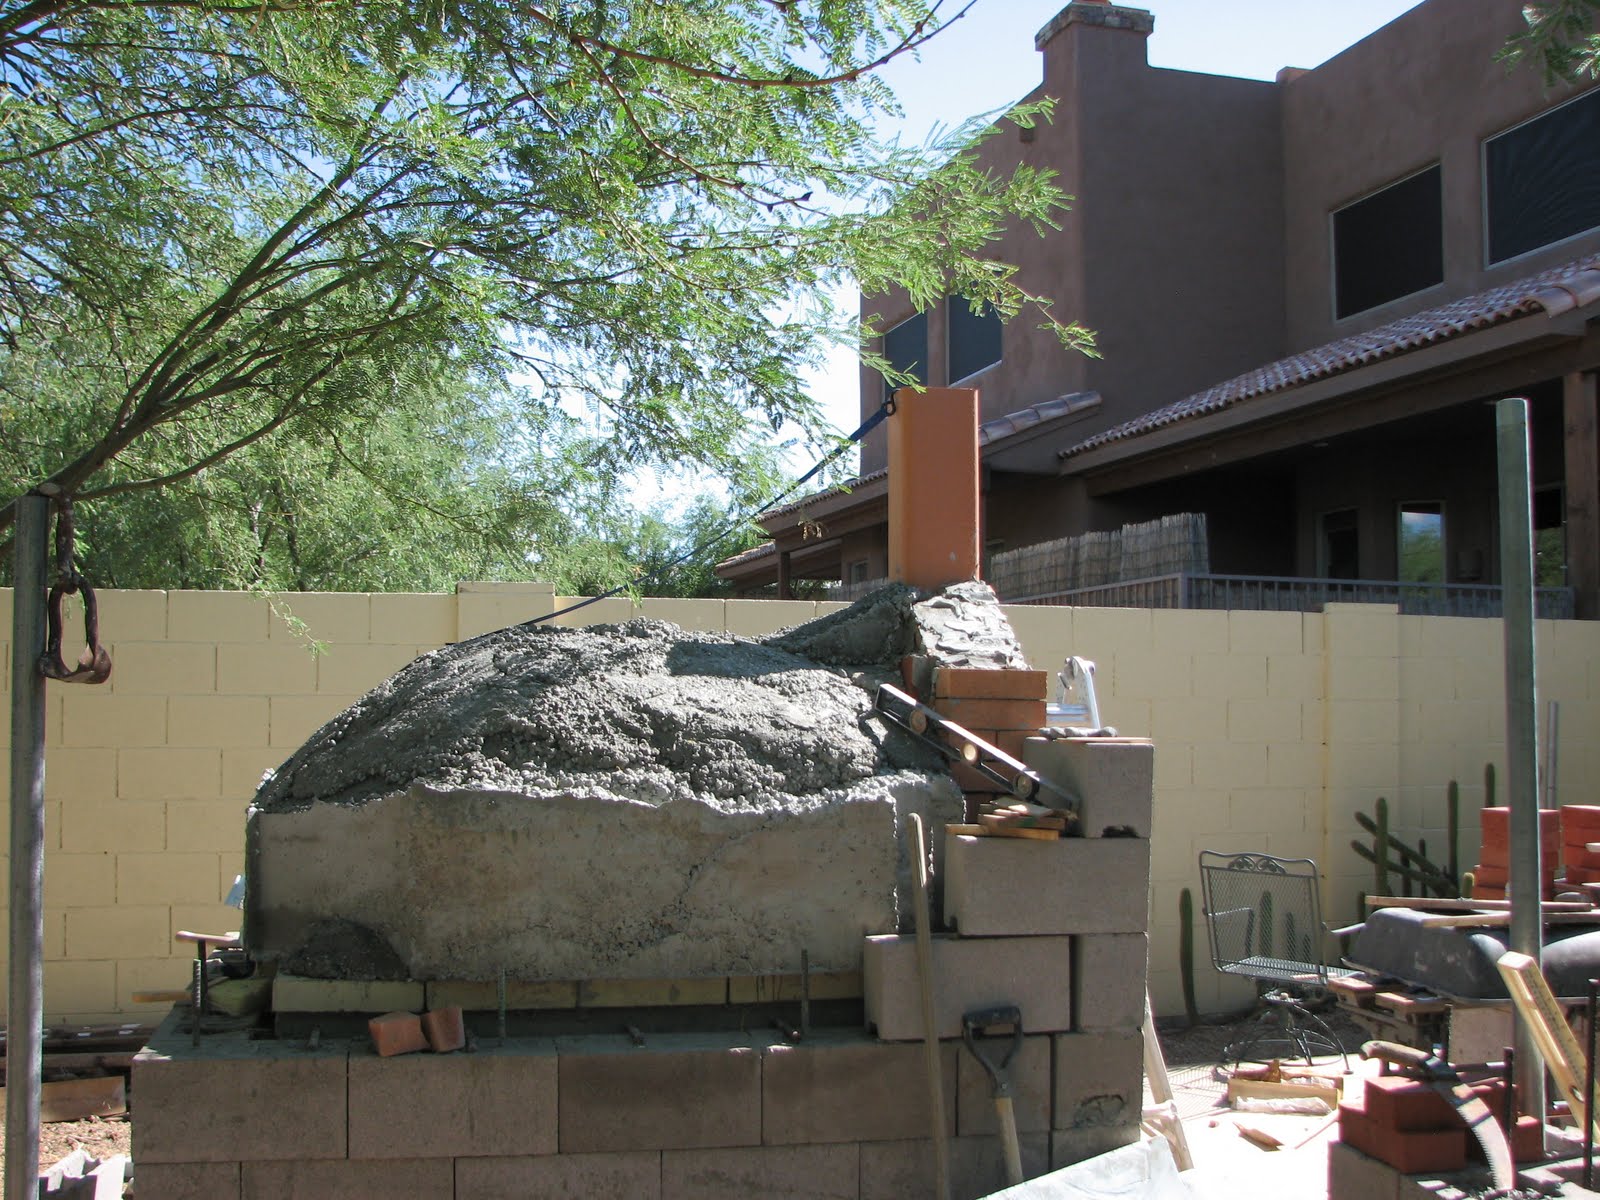
The Columns are up on the Bakery pavilion and next week we go to beams and joists for the roof… photos to follow!

Shot of oven during the first counter pour!
Friday, December 10, 2010
How to build a wood fired bread oven... the bread begins!

The Natives are restless. As I go through my daily business in our little town of Cave Creek Arizona, my friends and neighbors keep asking when the bread will be for sale. I tell them I’m working on it and give the latest update as far as baking progress.
My bread recipes are coming along and with each firing of the oven I learn more about the nature of this amazing piece of cooking equipment. As I run into difficult patches I find myself going back to advice that I have been giving aspiring cooks for the past few decades. I have offered the rule of three many times over the years. It goes something like this; take any dish that you would like to make and find a good recipe. Make it exactly as written three times stopping to think about what worked and what needed improvement by the third time you will be making a good solid example of what ever you are shooting for. The first time I tried baking in the big oven it came out heavy and dull. I was distraught… after all I’m supposed to be a cooking instructor. My wife Chef Kathy reminded me of the rule of three and the fact that it’s a learning experience.

I went back at it and on the third try I made real bread with a thick chewy crust that made a crunching sound as I bit into it. The flavor was deep rich and complex. My ingredients; flour, water and salt. I hope that you will use this blog as a resource to answer all your questions on baking and the construction and use of the wood fired “Black” oven.

Monday, December 6, 2010
From Bricks to Bread the Wood-Fired Oven

So the oven is completed except the stucco and paint, which we will finish after the pavilion that houses the oven is built. We are now working on our bread recipe and the layout of our lot for the future cooking school. Our concept is garden to plate cooking and the education of everything in between. I’m keeping a journal of this process and planning to write a companion book called “From Bricks to Bread, a journey into the wood-fired bread oven”. After a lifetime of cooking with wood I am now going in this natural direction. Bread and the wood-fired oven are both a real challenge. They require a dedication and the learning of the natural cycles of both the oven and the life cycle of natural leavens. I’m enjoying this process much more than I can express. Once again I’m excited about cooking. Kathy and I talk about these processes and possibilities for hours on end. We are planning our next stage of life. It will be based around the wood-fired oven and a cooking school. If this works out Kathy can work from home and we can cater, teach, entertain and offer a location for others to give classes and workshops. We are also going to offering a location for meetings and even weddings.
Below are the pictures of the last stages of the oven build for those that are interested.

I used foam to make the form for the cladding, his holds in the heat and functions as mass for extended bakings.
 This shot shows all of the cladding before we close it in the walls and add final insulation.
The front arch form and keyway.

Chimney facia with cut to follow roofline.

Rafters and block wall that will hold final insulation.

Top view of oven cladding before zonalite insulation.

Once again "mock up" of tile layout.

Dry stacked block and anchor bolt for rafter tie.

Zonalite insulation.

Our new puppy Max.

Finishing a large leaf into the counter top.

Pour of tables for bread baking classes.

Mesh and bar allow a long table with a clear span. Make sure and let this cure, keep a brace for a few weeks to fully allow the mud to harden.

End view of north table.

Pour in front of oven.

Shot of tile roof. I bought the tile on Craigslist for $35.

Nice view of front of oven. I have hundreds of shots if you need to see anything just shoot me a note and I'll post it.
Subscribe to:
Posts (Atom)